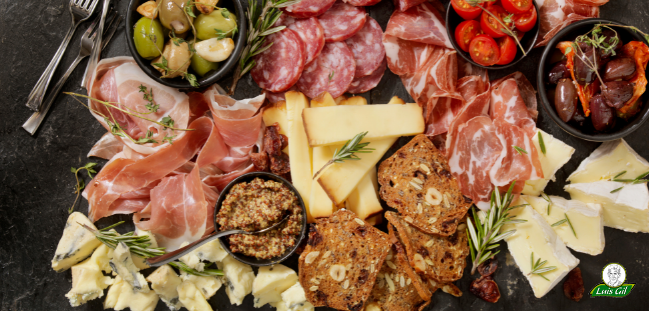
Cómo preparar la tabla perfecta de embutidos sostenibles para Navidad

A estas alturas ya habrás visto muchas tablas de embutidos en Instagram y quizá te hayas preguntado cómo podrías preparar tú una que quede igual de bonita y apetecible. Sigue leyendo y entérate de cómo montar tu propia tabla de embutidos, por supuesto, ecológicos y sostenibles, paso a paso.
Sin duda son un aperitivo perfecto para las comidas y cenas navideñas ya que gustan a todos, pueden sacarte de más de un apuro y además puedes prepararla con antelación.
Toma nota de los pasos a seguir.
1. La tabla
El primer paso es elegir bien la tabla o el soporte que utilizarás para crear tu tabla de embutidos.
Personalmente nosotros nos inclinamos materiales naturales como la madera (olivo, acacia, bambú…) o la piedra (cerámica, mármol, pizarra…) o incluiso combinación de ambas y por supuesto desaconsejamos materiales poco o nada sostenibles como el plástico.
En cuanto al tamaño y la forma tú decides, hay mil y una posibilidades: rendondas, rectangulares, alargadas, con formas orgánicas, con o sin asas…
2. Platos y cuencos pequeños
Como complemento a la tabla donde colocarás los ingredientes necesitarás pequeños platos y cuencos donde poner otro alimentos o salsas y condimentos que acompañen al embutido.
Opta por la sencillez, no incluyas demasiados y elige la mayoría en tonos neutros y transparentes y solo alguno con un toque de color para que no resulte demasiado recargado visualmente.
3. El embutido
Elige una selección de cuatro o cinco tipos de embutidos diferentes. Opta por un embutido de calidad.
Puedes elegir entre nuestra gran variedad de embutidos artesanales ecológicos elaborados a partir de nuestra ganadería de cerdos Duroc, criados en libertad en nuestra finca ‘El Encinar’, en el Valle de Ocón en plena Reserva Mundial de la Biosfera de La Rioja.
Te recomendamos nuestra selección favorita: Jamón Duroc ecológico, Lomo Extra curado ecológico y la versión cular de nuestro Salchichón Extra y Chorizo Extra ecológicos.
Puedes comprarlo ya loncheado para que así únicamente tengas que colocarlo en la tabla.
En caso de no disponer del loncheado deberás cortarlo tú mismo en lonchas muy finas.
4. ¿Qué mas incluir en una tabla de embutidos?
Tú serás quién decida qué incluir y que no en tu tabla de embutidos pero a continuación te detallamos una serie de alimentos que complementan y acompañan a la perfección a los embutidos:
- Quesos: juega a incluir distintos tipos y texturas… Curados, de pasta blanda, azules, ahumados… Las posibilidades son infinitas
- Panes: intenta que haya distintos tipos y con diversas formas… Pan de pueblo, panecillos, picos, galletas saladas, crackers…
- Encurtidos: olivas, pepinillos, alcaparras…
- Patés: de distintos sabores y texturas…
- Frutos secos: nueces, almendras, pistachos, avellanas…
- Mermeladas y salas: tanto dulces como saladas, pesto…
- Verduras: bastoncillos de zanahoria, tomatitos cherry, pepino..
- Fruta fresca y/o deshidratada: uvas, higos, orejones, pasas…
5. ¿Cómo monto mi tabla de embutidos?
Coloca primero de forma salteada sobre la tabla los boles y platos pequeños donde incluirás los alimentos como patés, quesos blandos, encurtidos, salas o mermeladas…
Ve llenando los espacios vacíos con el embutido y el resto de ingredientes (quesos, panes, fruta, etc).
Enrolla las lonchas de embutido para que queden más bonitas y ocupen menos espacio.
Corta el queso en distintas formas.
Presta atención a la composición de formas y colores e intenta que esté equilibrada y bien repartida.
¡Y voila, ya tienes tu tabla de embutidos, lista para disfrutar!


